Tomatoes in Central Virginia, Part 2: Planting tips

by Mark Levisay

Now that you have a better idea of what varieties of tomatoes you want to plant, let’s talk about how to plant them to maximize their growth throughout the summer. 

Spacing to minimize disease

Proper spacing of the individual plants is important in minimizing the spread of disease later in the summer. Rows should be at least 3’ apart, with the plants in the rows 2-3’ apart. The idea is to get as much sunlight to the plants and promote air movement to minimize fungal diseases. I use soaker hoses throughout my tomato beds, and it helps to have them laid out in addition to your support stakes or poles before you do any planting.


Tomatoes planted and tied to support poles.

Tomatoes planted and tied to support poles.

Establish strong roots

If you look closely at your tomato plants you’ll notice lots of little “hairs” on the main stem.  These will become roots if they come in contact with the soil, so your goal is to plant your seedlings as deeply as possible for maximum root development.  You’ll also notice two small oval leaves, which you want to pinch off. 

Bury your seedlings to within about 2” of the first set of leaves. Plant them as close as you can to your support stakes or poles and the soaker hose if you’re using it.  Never bury any leaves under the soil as they will rot and cause trouble later.  Mulch thoroughly all around the plants to conserve moisture and prevent soil splash onto the leaves.  (Important note: The soil splash is one of the ways that fungal spores in the soil can come into contact with the tomato plant.) 

Keeping good constant moisture in the soil, without being soggy, is a good way to prevent blossom end rot on the fruit. I use hardwood bark mulch in my tomato bed, but straw works well and you can use newspaper between the plants as well. Water thoroughly after mulching.

Feed plants through the summer

Tomatoes are classified as heavy feeders so it’s important to give them fertilizer of some sort all during the summer. Before I plant, I mix a cup or so of Espoma’s Plant Tone organic fertilizer in the soil where each seedling will go. Mix this in the soil when you dig your hole, and then firm the soil around the plant. You can use a high nitrogen (N) fertilizer at the beginning as you’re trying to promote rapid growth of the new plants.

Once the plants have begun to set lots of green fruit it will be time to add more fertilizer. Use a high nitrogen fertilizer for this application. Two weeks after your first ripe tomatoes, fertilize again, but this time use a fertilizer with a higher phosphorous (P) content, as this helps promote the fruit production. Continue this monthly schedule until fall.

Support plants

I start tying up my tomatoes as soon as they’re tall enough to get the ties around—sometimes even when I plant them.  Tomatoes want to grow UP and I think they do better if you help them climb the poles. Tying up also helps prevent damage from storms and high winds. In addition, we want the plant leaves as far from the soil as possible for disease prevention and the ties will help with upward growth.

To make the ties, I use old sheets or pillowcases torn into ½-3/4” strips about 10-12” long and tie them up after every 6-9” of growth.  I’ve also learned to put a wood or drywall screw into my poles ½ to 2/3 of the way up from the ground on the opposite side from the plants.  Later in the summer when your plants are loaded with fruit they’ll want to sag down and the screws give the ties something to latch on to.

Next time we’ll talk about training, pruning and other cultural practices in the tomato bed.

Have a garden question? Send me an email at marklevisay@gmail.com.

Tomatoes in Central Virginia, Part 1: Choosing the right variety

by Mark Levisay

Without a doubt tomatoes are the most commonly grown garden plants.  Nothing beats the flavor of a home grown tomato picked fresh from the garden—especially after eating the ones offered at the grocery store.  Seed catalogs give you lots of options for starting your own plants and garden centers usually have dozens of varieties ready to go right into your garden. With all of these choices available, how can you choose the right ones for you?

How much room do you have?

Tomatoes come in all sizes. They are usually classed in three groups 1. midget, patio or dwarf, 2. determinate and 3. indeterminate.  These descriptions refer to their growth habit and may affect your varietal choice depending on how much room you have for tomatoes in your garden. The smallest tomatoes are designed for pots or containers and probably won’t need much if any support.  Determinate plants will only grow to a set height (usually 3-4’) and then stop.  They usually need some type of caging or staking, but not as much as the indeterminate types.  Indeterminate tomatoes are the ones that get big—continuing to grow through the season until killed by frost or disease. They’ll need tall stakes or heavy duty cages for support.

Big Beef tomatoes tied up to supports.

Big Beef tomatoes tied up to supports.

How are you going to use them?

Choosing the varieties of tomato for your garden is hard because there are so many choices available!  It seems like tomatoes come in every size and color, so deciding what you want to use the fruit for will help with your decision.  Cherry and “grape” tomatoes are great in salads.  Most slicers and beefsteaks are great for general eating or putting on your BLT at lunch!  Paste tomatoes are often used for canning or sauce production, though I make salsa and spaghetti sauce out of slicers. 

Heirloom varieties

If you’ve never grown tomatoes in your garden before, consider trying an “heirloom” variety.  These are usually older varieties passed down through the generations and prized for their flavor. Many are not disease resistant, so if you’ve grown tomatoes before you may have trouble with them as the disease fungal spores can survive in garden soil for up to five years. 

Disease resistance is critical

In my garden, where I’ve grown tomatoes for 30 years, I look for the most disease resistant varieties I can find.  Many seed catalogs will list the disease resistance (using the abbreviations from the list of diseases below) in the description of each variety.  Generally the more letters listed in the description the better!  For example, in my Park Seed catalog the Better Boy Hybrid is listed as V/F1/N/A/St, giving you an idea of its general disease resistance.

Unfortunately, there are a lot of diseases that affect tomatoes. Eight of them are fungal in nature and will persist in your soil from year to year.  Early Blight (As), Late Blight (LB), Anthracnose (An), Fusarium Wilt (races 1,2,3 F1 F2 F3), Verticillium Wilt (V), Alternaria stem canker/crown wilt (A), Stemphylium gray leaf spot (St) and Septoria leaf spot (L).  You also have Tobacco Mosaic virus (T), Spotted Wilt virus (Swv), Bacterial Wilt (B) and Bacterial Speck (Pst). 

In addition to choosing the right variety, there are some tricks in how you grow the plants in your garden that help a lot, and we’ll explore that at length next time.

And remember, regardless of size, all tomatoes are tender annuals that require full sun and won’t tolerate frost at all. 

Lemon Boy tomatoes ripening in late summer.

Lemon Boy tomatoes ripening in late summer.

My tomato choices

This year in my garden I’m going to grow four different tomatoes.  I’m growing Sweet Million Hybrids, a red cherry variety that is indeterminate  with F/N/L/T resistance.  This variety is very vigorous and usually grows taller than the poles I use (8’ 2x2” posts).  Next is a red grape tomato we’ve come to love, called Juliet Hybrid which is a resistant, indeterminate type that will climb the pole and then climb back to the ground and look for the next pole down the row to climb back up on!  I grow Lemon Boy Hybrid yellow tomatoes which seem to have good disease resistance, maybe a little less acid than the red tomatoes and are indeterminate. They make really good yellow salsa!  My main red slicer is the Big Beef Hybrid, a former AAS winner.  These indeterminate plants have excellent disease resistance and produce loads of baseball to softball size fruits.

Next time I’ll review growing methods to get the most out of your tomato patch.

Have a garden question? Send me an email at marklevisay@gmail.com.

Growing vegetables in containers

by Mark Levisay

What do you do if you want to grow vegetables (or flowers for that matter) and you don’t have a yard to garden in?  If you have any sunny spot outside your home, you can grow a lot of different kinds of vegetables in containers.  Just as with garden beds, having lots of sun is key, as most vegetables simply won’t thrive in the shade.

Drainage is key

Almost any kind of container will work as long as it has drainage holes at the bottom.  The water must be able to readily drain out of the pot, and not sit in the bottom.  Plant roots want to be moist but not swimming in water, as they also need air to live.  Pot size will vary depending on the space you have and the types of plants you want to grow.  Obviously a tomato or pepper plant will need a larger pot than a couple of heads of lettuce or a few herbs. 

Larger pots are usually better, as you may need to water them less often.  One drawback of the larger pots is their depth which seems to increase faster than the diameter.  Most plant roots will only live in the top 8-10” of soil so the bottom of the pot is not really needed.  Many people use some kind of filler that doesn’t hold water and allows drainage, so your potting soil only fills the top half of the pot.  Collapsed plastic plant pots, closed cell Styrofoam, or just bark mulch will all work.  Rocks would work fine but the pot will be really heavy if you have to move it!

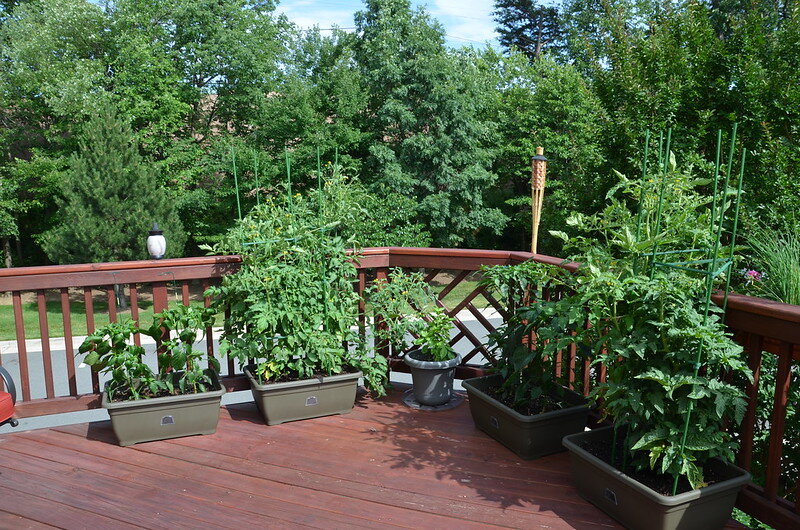
Railings can provide added support for tomatoes growing in containers.

Railings can provide added support for tomatoes growing in containers.

What should I plant? 

Determinate tomatoes (they only get to a certain size) or peppers are good candidates if you have large pots.  Herbs work really well, and several varieties could be grown together in a large pot.  Basil tends to get pretty big by late summer, so you’ll probably need a pretty big pot for that.  Lettuce and spinach can work in smaller pots if you keep the number of plants low.  Cucumbers should work well if you have some kind of trellis for the vines to climb on.

Planting and caring for your container crops

Planting is pretty much the same as it would be in a garden bed.  After checking your drainage holes (you may need to drill these out in plastic pots or add more to what’s already there) fill the bottom half (of large pots) with some kind of filler.  Add your potting soil, plant the seedlings or seeds, and water thoroughly.  Mulch is often helpful for retaining moisture.  Commercial potting soil usually contains a slow release fertilizer, so you’re good to go for 4-6 weeks before you need to add more.  A water soluble fertilizer like Miracle Gro or slow release pellets like Osmocote will work well.  Water frequently and thoroughly-you should see some water run out of the bottom of the pot. 

Unless your pots are sitting on gravel, they should be up off the surface of your patio or deck by at least an inch.  There are all kinds of plant stands of varying height which will do the trick.  We even found a plastic product called Pot “Toes” on Amazon-use 3 or 4 per pot to raise the pot.  This promotes drainage and allows the surface (wood, concrete or tile) to dry out between waterings.  In our warmest summer weather you may need to water almost every day, as the entire pot will be over 90 degrees and evaporation will be rapid.

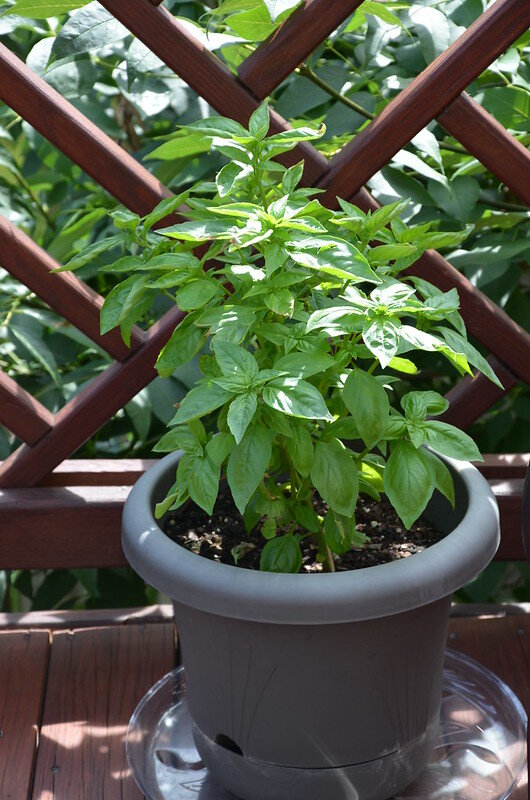
With plenty of sun, basil grows well in containers.

With plenty of sun, basil grows well in containers.

At the end of the growing season you have two choice of what to do with your pot.  You can pull out your spent plants and save the pots full of soil for next year. This works well if you’ve planted perennial flowers, as many will over-winter.  You’ll just need to add fertilizer at the beginning of the next growing season, as the original fertilizer will be depleted.  The other procedure is to remove the soil and filler from the pot completely.  The used potting soil will make a good addition to traditional garden beds if you have them.  Rinse your pots with water to remove soil and plant debris, and then disinfect the pots with a water and bleach solution mixed 10 parts water to 1 part bleach.  This should kill any fungal spores or harmful bacterial that may have accumulated during the growing season.  Store the pots somewhere dry and they’re ready to start all over next spring.  You’ll get many years of use out of good quality pots, so why not give it a try?

Have a garden question? Send me an email at marklevisay@gmail.com.